Blog Archives

Making a Music Video: Producer’s Guide

Before we talk about anything else, actually securing a music video gig comes first.

And like other forms of commercial production, word of mouth and bidding are huge drivers to getting gigs making music videos.

But your first few gigs may come through the grapevine from friends, or even a university alum. You might reach out to artists through email or Instagram—every person’s specific path towards this line of work will be different.

If you can’t say you started in high school, never fear. Your conscientiousness can become just as big of an asset as your skill set or years in the biz.

i had a sitdown and chatted with Owner Matt Phelan of Chisel Pixel Productions who knows that being a problem solver can not only help get future gigs, but help grow a career.

“Labels usually have a thousand different things going on at once so if you can show up and help them with issues, that’s so valuable. You can offer options to accommodate their schedules or have a PA pick them up from the airport.”

If you get your reps in, hone your craft, how to make a music video will become second nature. You’ll then have a reel you can confidently pitch to anyone.

Over time, you’ll also likely develop a music video production style that’s easy to spot, helping to secure future jobs—kind of like the vibrant colors used by the directorial duo BRTHR…

As you produce more and you build up a good reputation, with a unique style, artist’s managers and labels will (fingers crossed) start reaching out to you instead.

Bigger budget shoots and getting work as a pro

If you’ve been around awhile, you’ll likely get recommended for shoots. Or, you’ll hear about something coming up from the shoot you’re currently on –always hustling for more work while working! But in general, and for larger-budget productions, artist’s teams and labels are more likely to shop around on video producers, so, you are going to need to find out their budget and market yourself.

As silly as it sounds, try asking what their budget is. 20-60K is pretty typical for most music videos. Though, a larger-budget music video production, can get up to 100-300k or more. On larger budget projects, a label or artist’s manager will send a creative brief that includes the budget and ideas for the creative direction for the video. With smaller budget projects, your mileage may vary.

Then you’ll need to share a treatment based on their budget.

Making a Music Video - Treatment - Wrapbook
Shooting a music video starts with creating a treatment.

A treatment is a document that shows your vision for what the music video will look like, be about, and will fit the scope of their given budget.

Planning a music video: pre-production

Answering the question “How to make a music video” starts in pre-production.

Beyond getting the treatment approved by the artist, you’ll want to take these steps.

1. Finalize cast & crew

When planning and making a music video, you’ll need to decide who’s in front of the camera and who’s behind it.

For smaller-budget projects, the cast might be limited to the band and their friends. And your crew may just mean you, a DP, and a second camera operator.

On larger-budget projects, it’s crewing up just like any other shoot. You may be able to bring in and hire non-locals, but regardless, you likely already have your go-to crew whom you’ve worked with previously.

However you get it done, just get it done. It’s one of the most important decisions you’ll make both creatively and financially. In terms of the logistics, make that easy on yourself and just get it streamlined. It will save you so much time and money.

Ensure you have some kind of film crew list to easily source and hire your team, but generally if you’re working on a lot of projects, it’s best to have a solution that easily onboards your regulars or new hires from project to project. If you already use Wrapbook, you’ll have access to anyone you’ve ever worked with through the auto generated film crew list it creates, and you can easily onboard them from there for payroll purposes.

Whatever your system is – just ensure you have a system. Making music videos means many moving parts. So, pro-tip? Streamline what you can.

2. Set clear expectations

When you’re working with so many different people, as a producer, many things will get asked of you. No surprise there. But you, being the producer, will have to set expectations for what is and isn’t possible. And so the first thing that we want to consider here is, obviously, clear communication.

When it comes to working not only with a lot of people on one project, but a lot of people across multiple projects, you’ll likely prioritize larger-budget projects first. And so, you might need to communicate this to your other clients from the start, (of course without mentioning their budget). This really boils down to you being upfront with yourself about what you can and cannot do, and when, and then communicating that to the client, artist, or or artist’s team.

And setting expectations as you’re making a music video is, of course, vital. There might be times when you’ll have to bring up the nature of a low-budget project to the client. Those instances might feel awkward but it’s ultimately all for the better of the project.

At the end of the day, budgets limit how you can execute certain concepts for videos.

“An artist may want a crowd of people to follow them around on the Santa Monica pier, but that’s a handful of filming permits and tons of extras.”

An alternate location with a group of the artist’s fans or friends can work just as well and keep the essence of the same music video concept alive.

Other considerations on small budget shoots will also be worth bringing up.

It’s possible that where the producer might cut corners in production, they can try to make up for it in post.

If you’re clear and up front about what’s happening from the gate, most clients will appreciate you working within their budget to make the creative as mind-blowing as possible.

3. Musicians may need prep too

You’ll also need to set the expectation with the artists that their performance in the video should reflect the studio recording. This is where the band or artist may need to find time on their own to run through the song.

Additionally, you can now also export this cast and crew info out of Wrapbook to make your call sheets. Alternatively, you can choose to save this info somewhere else on your computer, like your drive or desktop.

Whatever your system is – just ensure you have a system. Making music videos means many moving parts. So, pro-tip? Streamline what you can.

This is another place where communicating what needs to happen ahead of time will save you on filming days.

4. Keep gear expenses as low as possible

Especially for smaller-scale projects, you ideally have your own equipment, gear you can borrow from a friend, or a community arts program where you can rent on the cheap. If you’re a newer producer, you may find someone else who is also looking to gain experience making music videos and can bring their own camera.

On larger projects, you may need to pay kit fees so crew can work using their own gear.

5. Lower the decibel levels on set

If the live band has a drummer, you may also want to get mesh heads for any drum sets and muted cymbals. Tell the drummer if they’re comfortable they can remove the kick drum beater to keep things more quiet on set.

6. Assemble a storyboard and shot list

Plan out your production by illustrating the key shots in the video through a storyboard. In a larger production, this allows the director and DP to create a shot list to hand over to the 1st AD (if there is one) to schedule out the shoot. That way, crew and any feature talent aren’t just sitting around or time’s being wasted as you move between locations.

Labels and managers may also want to get more involved in planning a music video and see the storyboard. This is where using a slicker storyboarding solution like Boords makes more sense.

How to film a music video? Start with a storyboard. A-ha’s iconic music video for “Take On Me” is a storyboard coming to life.

Once the storyboard is good to go, you can map out your filming and put together a shot list. Here you can outline what specific equipment, talent, and locations you need during time slots.

Larger budget projects may have more in-depth shot lists that include:

  • Setup numbers, grouping for any unique camera and lighting setups by placements with specific lens setups, mics, and supporting equipment (dolly, tripod, etc.).
  • The focus of a specific shot such as establishing the scene, on-air talent, a prop, etc. This section can help with planning when artists need to be ready and whether a prop requires extra prep such as freshly cut fruit.
  • Which camera will be used (for multi-cam shoots).
  • The potential number of takes and rough time it takes to film each.

Scheduling is a beast that varies from project to project, but bottom line: you need to firm this up in pre-production to keep your budget on track.

7. Secure insurance

Depending on your project’s budget, you’ll need to get production insurance. Consider also a filming equipment policy to protect you in case of theft or damage.

If you’re not clear about your potential liability during production, be sure to check with a lawyer.

Shooting a music video: best practices for production

There’s more than one way to crack an egg when you’re working through how to shoot a music video. However, keep in mind these best practices as you go into filming and set up.

1. Shoot A LOT of coverage and limit locations

Regardless of your budget, one tip to consider is choosing only a few locations so you can focus on getting great footage instead of wasting time and money on company moves.

Limiting locations gives you plenty of time to get clear alternate takes that will give you more options in post. Do a bunch of passes. Wide passes, individual passes, and two-shots – they’re all worth so much more than a feeble attempt at trying to tell a story with a million locations and not a lot of money.

If you’re weaving in a narrative when making a music video, limiting locations can work in your favor as you spend more time getting the right shots.

And even if you have a ton of money, limiting locations might still be a good idea.

Ultimately, you want the video to make the song pop, but a key way to do that is for the video to complement the structure of the song itself. There are a million ways to do this artistically, but you can also consider location too. The verses, the chorus, and the bridge may only need three different locations. They may only need one to two, depending on how you adjust the set or if one room is perfect to reflect the content of the song.

By taking a minimalist approach to locations, you’re saving money and likely pushing the creative in unique ways. You know, ‘necessity is the mother of all invention,’ something like that.

More coverage helps with endings

Aside from location, overshooting is helpful when crafting the ending.

Say you’re filming a performance, let the artist know what you want them to do once the song ends. Do you want them to just stand there? Look right into the camera? Walk away?

Be sure to overshoot at the end of each take so you capture alternative endings to the video.

2. Note “keeper” shots

Having a variety of shots to choose from means a much more simplified post process.  Finalizing specific sequences by noting particularly strong takes as you’re shooting a music video, is huge. You can even include a description of how the tone or visuals may differ when you’re documenting this.

3. Build an extra hour into filming

The singer shows up late. Someone’s car breaks down. Stuff will hit the fan. Consider building an extra hour into your day’s schedule for shooting a music video. While this may fall into pre-production, things change the day-of all the time, so whenever this happens in your process, just make sure it happens.

But logistical concerns aren’t the only reason you might give yourself extra time. Music videos, in general, can be a little more lax than the tight schedules of a film or television show. Use this extra hour to capture more creative.

4. Work in inserts shots

If you’re setting up new cameras and/or lighting between scenes, many producers will use this time to work in filming insert shots since they require the least amount of crew and gear. For example, you may have a bouquet of roses on a doorstep and only need to get a close up shot of them.

5. Always have a paper trail

File this tip for making a music video under “cover your rear.”

If any dispute comes up between you as the producer and the label or artist regarding the video’s concept, on the day of filming, or otherwise, you’ll want to show documented conversations where they approved the treatment.

This also includes any other contractual agreements you might want – from NDA’s to crew deal memos, be sure to file and store them somewhere safe whether that’s on your drive or in Wrapbook.

How to make a music video come together: best practices for post-production

You’re almost to the promised land! The ease of your post process will likely depend on the intricacies of your video and the needs of the label.

You’ll have to run cuts by the label, and various levels of VFX or green screens used will affect the length of the process as a whole.

1. Not handling the edit? Provide a more in-depth treatment

On larger budget projects, you may not be doing the editing. If you want to avoid micromanaging edits, you can create a more detailed treatment of the video to make sure the post team nails it.

2. Editing yourself? Start with the performance

This tip can be handy if you’re handling the edit. If you’re making a music video that features a performance, put the performance on your timeline first. Treat it as one big performance video. Then insert the b-roll later and any alternate scenes if you’re interweaving a story.

There might not be many variations in the footage. Think about how you can introduce a new effect or shot you haven’t used before as the song progresses.

3. Hire a musical editor that cuts to the beat…sometimes

Whoever is doing the editing will know the music guides the edit, not the other way around. Sometimes it will make the most sense to cut to the beat and to insert cuts that emphasize beats. But not always.

Listen for the sections of the song to determine when it’s time for you to ramp up the energy visually. For example, the song’s bridge might increase in tempo so you may choose clips that reflect the musical mood then to enhance the visual.

If you’re hiring out an editor, hire a musical editor.

“I see so many videos cut by professional editors who apparently don’t understand rhythm. It’s so much more than cutting to the beat. Sure, sometimes it will be as simple as that, but more often it’s more about understanding the musical structure and feel and then cutting to the flow of the song,” said Ed.

4. Hone your style

How to make a music video requires the knowledge to blend technical skill set with stylized subjectivity. Whether you’re producing a music video and working with an editor or jumping in to edit yourself, you may have an opportunity to mesh your perspective with the incredible technology of today. Visual effects in post are where you can define your style further. Being bold can pay off.

Singer and all-around influencer Doja Cat in her video for “Streets,” draws inspiration from TikTok’s Silhouette Challenge for the video’s intro.

5. Develop bonds with your go-to post producers & trust them

How do you make a music video demands more than smart talent, building relationships as a producer should be a priority.

If you work with editors and other post folks in making music videos, they may do you favors on smaller projects because they know you’ll pay them fairly on larger budget productions.

“I have go-to people that charge me a decent price as they know the budget I am working with. For example, I won’t be overly demanding when it comes to color correction. I will only ask for revisions if it is strikingly wrong, otherwise I will trust their eyes,” said Ed.

Making a music video and a career out of producing them is like a Jay-Z video. It’s all about swag — but also not being a jerk and finding people who have complementary skills to what you do!

You may be very creative and regularly work with someone who is great at managing client relationships and organized. Or vice versa.

Producer Matt Phelan trusts his crew…

“When I deliver an edit, I trust my production company with their art because I know it’s going to be good.”

Focus on what you bring to the table and trust others to do what they do best.

Wrapping Up

Making a music video has a ton of considerations and everyone has their own process. As you shoot more and more videos, you’ll likely hone a style that’s uniquely yours. However, while your style is all your own, there are other, fairly objective, considerations to take in—most obvious, those relating to budget. Whether your budget is $300 or $300k, anyone can benefit from some financial best practices.

What do all the knobs do on the SSL UC1?

The Basics

As you might expect from a pedigree that dates back decades there is a lot to consider when using the UC-1. To make things simple and for the purposes of brevity I have included links that explain some of the technical terminology that has grown up around the naming of the knobs (highlighted in blue text)

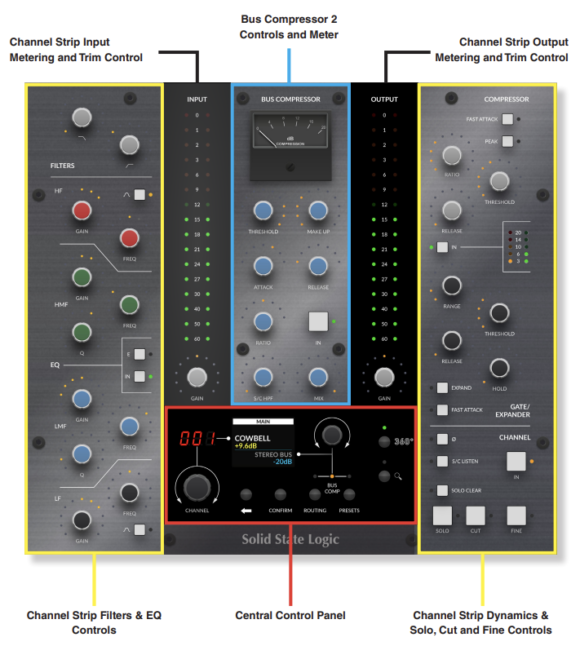
Think of the UC1 as being one vertical strip of knobs from the classic SSL Studio Console (plus a little more ;-))

So you have your UC1 setup with your 360 software and you have been toying with the knobs to begin to gain an understanding of what they do. So while the UC-1 is a sexy animal, the processing that it covers probably isn’t – but don’t let that put you off! The focus is on getting what might be considered the “raw” sounds to sound as good as they possibly can. For sure this is the place to start before you think about adding Reverbs and Delays and other effects. There are a couple of sensible places to start to begin to understand the intricacies of the UC-1 and I would encourage you to do both:

  1. Grab you favourite track in your DAW of choice and play with the pre-sets (13, below) – observing the settings as well as the impact on the sound, mixer track by mixer track
  2. Read the rest of this blog post and watch the accompanying videos

    Perhaps the best key to understanding is to go to the plugins that the UC-1 was built to control. In the first instance there are:

  1. The Channel Strip 2 Plugin
  2. The Bus Compressor 2 Plugin

Looking at the image above you can see that the Channel Strip 2 plugin sits at either edge of the UC-1 surface and the Bus compressor 2 in the middle top. At the bottom-centre of the UC-1 there is also the “Central Control Panel” which can be used to navigate the 360 mixer (and your own DAW’s mixer) as well as giving us some other useful functionality such as basic transport controls .

  1. Track Name Name of the track the Channel Strip is inserted on & the plug-in number order within the 360° Plug-in Mixer window.
  2. Bypass Toggles Plug-In Bypass In/Out
  3. 360°Quick Access to open the SSL 360° Plug-in Mixer
  4. Input Section Input trim control with +/-20dB Gain & Polarity Invert Button
  5. EQ 4 Band EQ with LF, LMF, HMF & HF bands with Bell options on LF & HF bands, with additional Hi Pass & Low Pass Filters
  1. Dynamics Dynamics section with Compression & Gate/Expander processing.
  2. Process Order Window Allows for re-arrangement of processors on the incoming signal or S/C signal.
  3. Input/Output Meters Large Input & Output Signal meter with summed RMS metering alongside.
  4. Channel Fader Section Expanded Output section with M/S Width Control & Pan Control (Stereo Only), as well as VCA Modelled Fader Output, Solo, Cut, Solo Clear/Safe, S/C & digital Output Trim
  5. Plug-In Version Number  Shows the current version number of the installed Plug-in
  6. HQ  Enables/Disables ‘High Quality’ Mode, enabling 2x Oversampling.
  7. Contextual Help Selecting the button opens a text window tooltip that will open when the cursor hovers over a controllable parameter. The text box will give a brief explanation of the parameter function.
  8. Plugin Preset Selection  clicking on the preset name will expand a window to enable the selection of SSL presets & user saved presets. clicking this will also allow the current plug-in settings to be saved as a preset for future use.
  9. A/B Enables the option to alternate between two different settings for comparison without using the preset menu.
  10. Undo / Redo Enables the option to undo a parameter change, or redo an undone change.

The “Knobs”

It helps to split the knobs into their respective families:

  • Filter & EQ
  • Dynamics
  • Routing and Side-Chaining

The Filter & EQ Family:

Channel Strip 2 features the classic 4-band SSL EQ layout, digitally modelled on the curves of the XL 9000K EQ circuit & includes a 12 dB per octave low pass (LP) filter and 18 dB per octave high pass (HP) filter able to be positioned Pre or Post EQ

1. LOW-PASS FILTER
12 dB per octave low-pass filter

2. HIGH-PASS FILTER
18 dB per octave high-pass filter

3. HIGH FILTER SHELF
+/- 20dB HF Band between 1.5 kHz & 22kHz with optional Bell Curve

4. HIGH/MID FILTER Band
+/- 20dB HMF Band between 600Hz & 7kHz with Q Width 2.5 to 0.5

5. LOWER MID FILTER Band
+/- 20dB LMF Band between 200Hz & 2kHz with Q Width 2.5 to 0.5

6. LOWER FILTER SHELF
+/- 20dB LF Band between 40Hz & 600Hz with optional Bell Curve

7. E / G Button
The CS 2 EQ Curves can be switched between G-Series and E-Series curves using the button. When in G-Series mode (default), the shelving curves have a degree of overshoot/undershoot (depending on whether you are boosting or cutting) below the selected HF frequency or above the selected LF frequency. Selecting the button removes the overshoot/undershoot effect and provides a slightly gentler slope to the shelving curves.

8. POWER The EQ can be switched in/out using the EQ button.

.

The “Dynamics” Family:

The Dynamics section includes a Compressor/Limiter and an Expander/Gate. Both sections work independently but can be operational at the same time, providing sophisticated control of signal levels. The Dynamics section can be switched in/out using the DYNAMICS button.

1. COMPRESSOR DRY/WET MIX
Determines the parallel mix amount of wet signal added to the Dry pre-compressed signal. 100% means the signal is entirely the signal passed through the compressor section, and 0% is an entirely dry signal path following the previous channel strip processing sections. 50% would be equal amounts wet to dry signal.

2. RATIO
The severity with which the signal is reduced when it exceeds the THRESHOLD.

3. THRESHOLD
Sets the point at which gain reduction is applied to the signal. In this compressor design, the Threshold also applies an automatic gain-make-up.

4. RELEASE
Controls how quickly the level returns to normal after the input level has dropped below the Threshold (measured in seconds).

5.FAST ATTACK
The attack time is adjusted automatically to match the audio. To choose a constantly fast attack time, press the FAST ATTACK switch.

6. PEAK / RMS
This button switches from RMS to peak signal detection. In RMS mode (default) the compressor reacts to the average signal level and has a soft knee characteristic. When switched to peak mode, it responds to peak signal level and introduces a hard knee characteristic, resulting in more dramatic compression.

7. Metering
Compression Metering is shown on the left-hand array of five LEDs (yellow and red)

8. Power
The On/Off switch for the Dynamics Section enables and bypasses the Dynamics from the circuit.

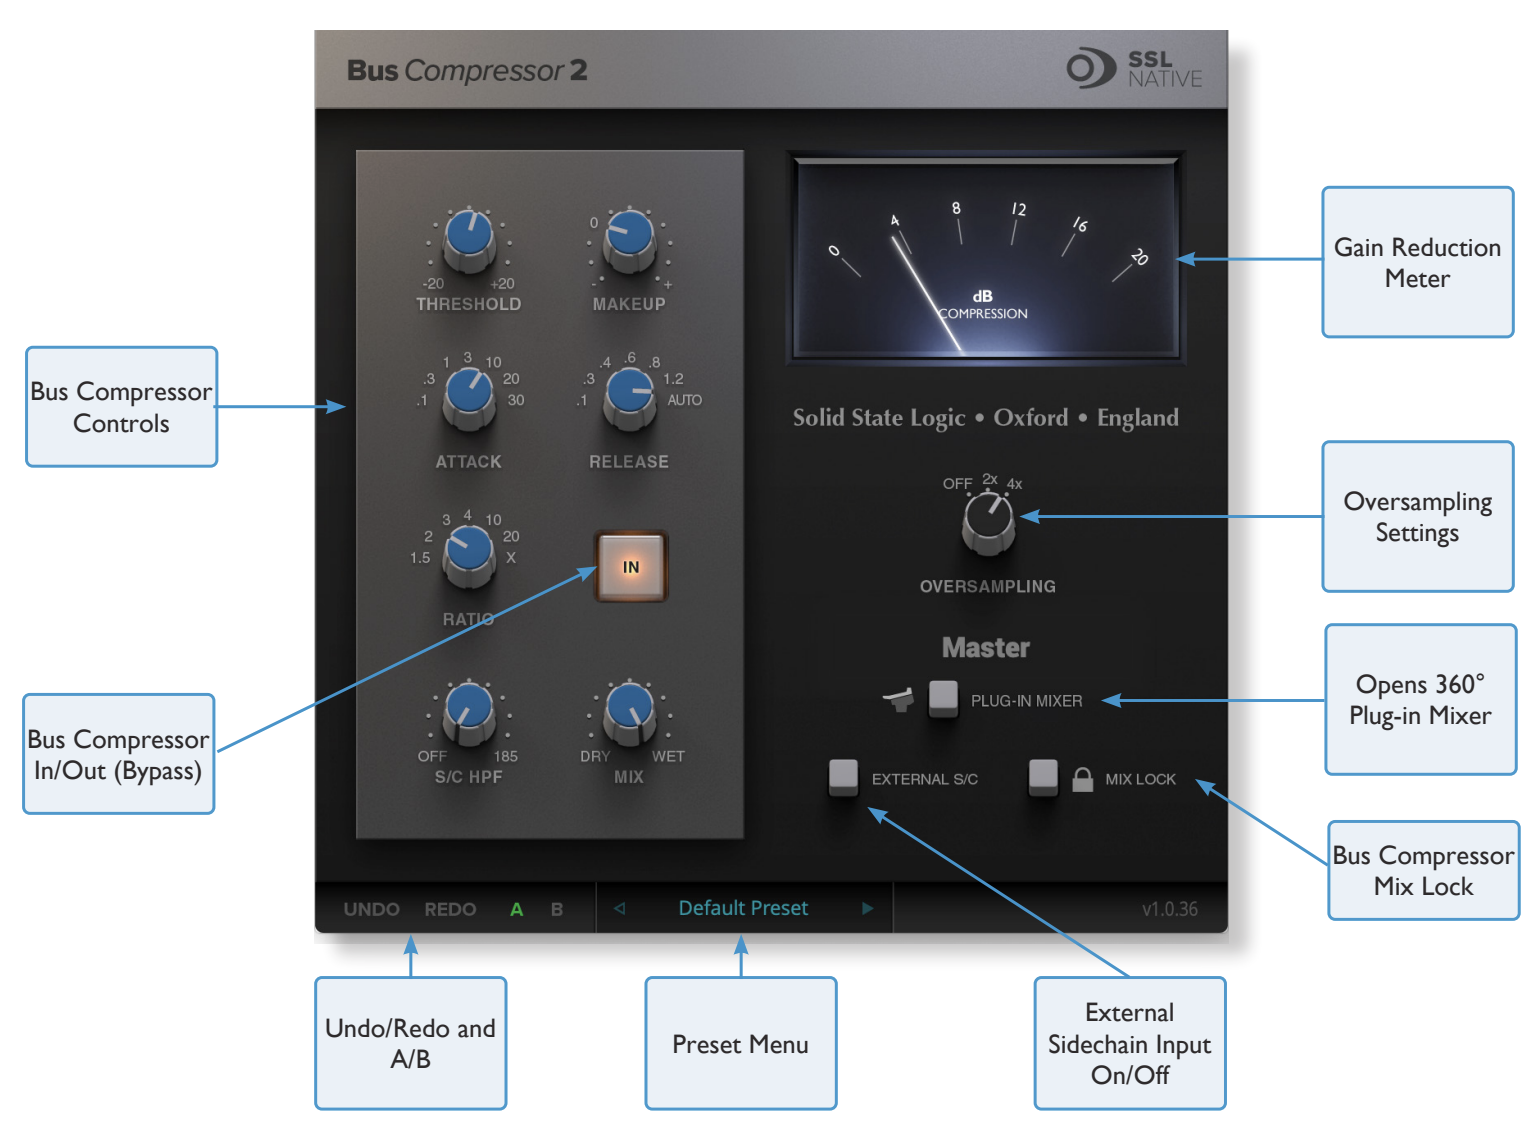
Bus Compressor 2

Overview

mceclip1.png

I/O

Bypass

mceclip3.png

When switched out, the Bus Compressor is bypassed. Where possible, this is linked to the DAW’s insert bypass feature

Compressor

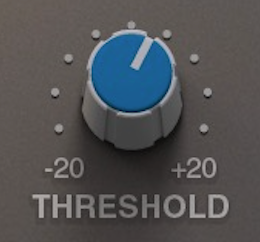
Threshold

mceclip4.png

Controls the level at which gain reduction is introduced.

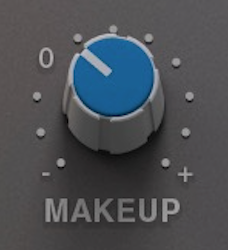
Makeup

mceclip5.png

Provides a gain stage to compensate for any reduction in level caused by compression.

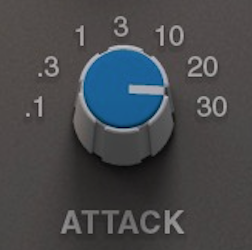
Attack

mceclip6.png

Controls the response time of the onset of compression once the threshold is crossed. The 20 ms option has been introduced in Bus Compressor 2.

Release

mceclip7.png

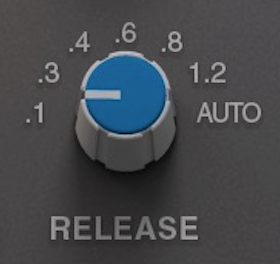
Controls how quickly the level returns to normal. The .4, .8 and 1.2 second options have been introduced in Bus Compressor 2.

Ratio

mceclip8.png

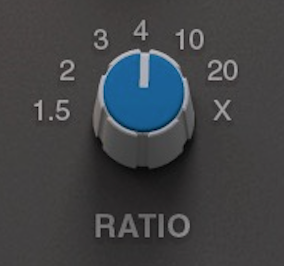
Controls the degree of compression. The 1.5, 3, 10, 20 and X options have been introduced in Bus Compressor 2. X is the most aggressive option – greater than 20, but less than infinity.

S/C HPF

mceclip9.png

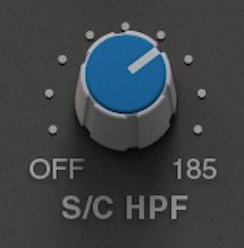
Applies a high-pass filter to the compressor sidechain.

Mix

mceclip10.png

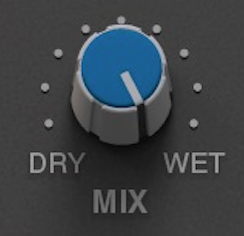
Controls the blend of the processed (wet) and unprocessed (dry) signals. Using a blend between 0 and 100% is commonly referred to as ‘parallel compression’.

Advanced Controls

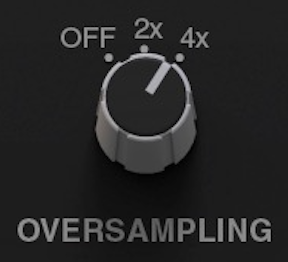
Oversampling

mceclip11.png

Bus Compressor 2 features the ability to use oversampling DSP. Options are provided for none (OFF), 2x and 4x. When compressing material heavily (e.g. smashing a drum bus), you may want to experiment utilising oversampling, as it will help to reduce unfavourable distortion that may be being introduced. The DAW will introduce a small amount of delay compensation for Bus Compressor 2 when oversampling is used.

External S/C

mceclip12.png

The EXTERNAL S/C button allows the Bus Compressor sidechain to be fed from a source different to the internal sidechain. e.g. A bus send could be set up in the DAW, such as a kick drum that could be used to creatively ‘pump’ the Bus Compressor. Please note you will need to determine the external sidechain source using your DAW’s plug-in header bar

Mix Lock

mceclip13.png

MIX LOCK excludes the MIX control from the preset system, which can be useful for auditioning different presets, without the MIX control responding to the preset being loaded.

Metering

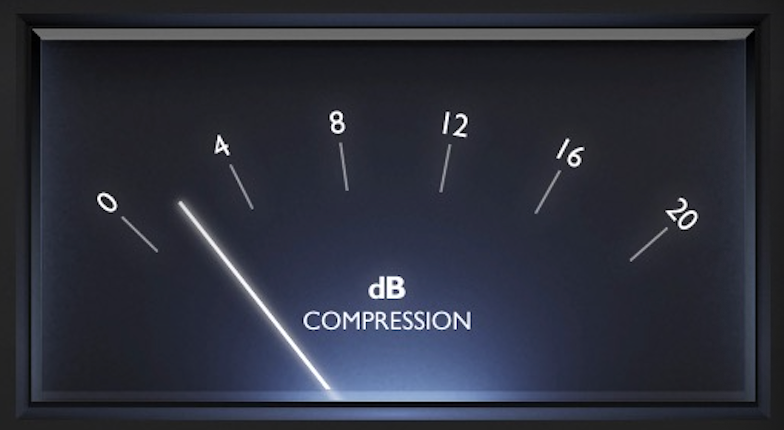
Gain Reduction meter

mceclip14.png

The meter shows how much gain reduction is being applied by the Bus Compressor 2 plug-in in the style of the classic moving-coil meter found on SSL consoles.

66 effects in the Harmonizer from Eventide + 176 impulse responses for free

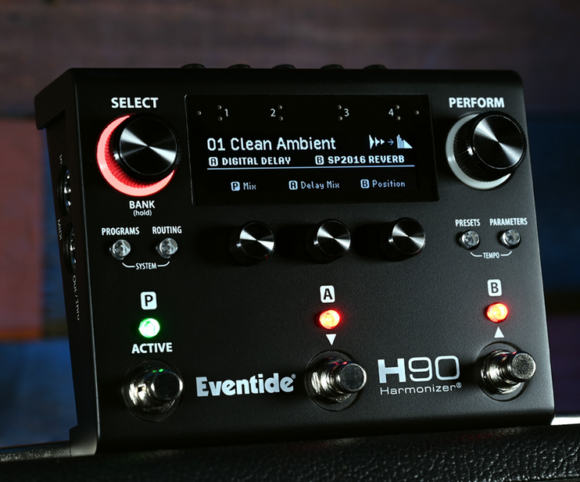
Eventide has released the limited Dark Harmonizer Edition for the popular H90 multi-effects pedal. In addition to the 52 effect algorithms of the standard H9 Max Harmonizer model, there are 14 new effect algorithms: Polyphony, Prism Shift, Bouquet Delay, Head Space, Weedwacker, Even-Vibe, Wormhole, Instant Flanger, Instant Phaser and SP2016 Reverb. Hundreds of program combinations provide creative effects that can be used across genres and for a variety of instruments. Effects can be routed in series or parallel.

Dual mode enables the simultaneous processing of two independent stereo signals. There are four inputs and outputs (two of which are mono inserts), an intuitive user interface tailored to the user and an integrated tuner. In addition, modernized polyphonic pitch shifting is made possible thanks to SIFT technology. The device also has five push-turn controls. The H90 Control software, which is used to edit programs, is included in the purchase price.

Price and availability:

The H90 Dark Harmonizer is now available from specialist retailers for 1099 euros. You can find more information at Eventide.

free! 170 Black Hole Reverbs, Plates, Shimmer & Pitch-FX vom Eventide H90

When it comes to reverb and bending sounds, Eventide is right at the forefront – just think of Blackhole and the legendary H9000 effects processor. With the H90, there is now a pedal based on the latter but in a compact form. The best thing about it is that the pedal is not only suitable for guitarists, but can also provide great templates for ambient, techno and drones – in a matter of seconds!
And best of all: you can now use the sound too, because the Beat editorial team has taken the trouble to meticulously “cloned” the H90 for you! There are 176 carefully sampled Impulse Responses waiting for you, which you can load into
any Convolution Reverb. If you don’t have one yet, just use the fancy Convolution XT from Wave Arts, which is included with the downloads.

Included are …

  • legendary black hole reverbs,
  • crazy pitch-shifter echoes,
  • octaved reverb tails,
  • realistic drum rooms,
  • metallic multitap delays,
  • dissonant plates,
  • spring reverb/flanger combinations,
  • distorted ring modulators,
  • endless shimmer effects

and many other treasures with which you can make even the lamest sound interesting.

Have fun experimenting and creating amazing music! Download now and transform your tracks! Get the pack at HERE.

Let’s Welcome The New Advances In Vinyl Record Pressing Technology

The technology of record pressing has been virtually stagnant for over 40 years, with lathes and record pressing machines relying on cannibalized parts from old worn-out equipment to keep them going.  Thanks to the resurgence in vinyl sales, which injected more money into this side of the business, brand new and improved equipment is being manufactured, along with some major technological advancements. Let’s take a look at some of these new in vinyl record pressing.

Viryl Technologies Warm Tone Vinyl Press

New Record Presses

Until recently, if a pressing plant wanted to add another record press, they had to scour the world for forgotten pressers in old warehouses. While this did happen occasionally, most stampers found this way weren’t in good enough condition to be used immediately, as they required extensive refurbishing, which took considerable time and expertise.

For the first time, several companies are now releasing brand new record stamping machines, which pressing plants are eagerly acquiring (the backlog at most facilities is about three months).

Toronto-based Viryl Technologies’ Warm Tone press (see the graphic above) is computerized and fully automated, allowing a record to be stamped every 25 seconds—about half the time of a traditional press. This is something that the vinyl record community has longed for and it has finally come to pass.

Ecology-Minded Pressing

Making a vinyl record is a messy, time consuming process that involves toxic chemical baths, large mechanical presses, stampers that wear out easily, and perhaps worst of all, a final product that’s made from a petroleum byproduct.

Record pressing has shown small improvements over the years, but other than Viryl Technologies Warm Tone mentioned above, it’s still done the way it was 50+ years ago.

That said, new injection moulding process invented by the German company Sonopress called EcoRecord, promises not only to cut production costs, but to improve the sound quality, and reduce the environmental impact of conventional record pressing as well.

In a conventional press, a PVC puck is heated with steam until soft, then placed between two stampers and pressed for about eight seconds. It takes about 20 seconds to press, followed by another 16 seconds for the record to cool before the process can begin again.

In the new process, a recyclable PET mixture is pre-heated, injected between two stampers, then pressed for a few seconds and cooled for another 20 seconds to ensure the mixture reaches the outer edges of the stampers.

There are several big advantages with injection moulding. First of all, the amount of energy used is cut by up to 85%. There’s no excess vinyl to trim, and the stampers last much longer before degrading.

Currently, a stamper may last for as few as 2,000 records before needing replacement (although the figure is usually higher). Yet another happy byproduct is that the record’s surface noise is reduced by up to 10dB over conventionally pressed records.

This seems like a slam dunk, but there are still a few challenges to overcome. So far, injection moulded records appear to be less durable, showing signs of wear after 35 plays compared to 50 for a traditional vinyl record. It can also be somewhat more expensive.

That’s not the only new system with ecological promise. British Evolution Music has introduced the world’s first bio-plastic record, which uses natural sugars and starches instead of plastic. Another British startup, Elastic Stage, is also working on this technology.

So the good part about vinyl record pressing is that new technology is finally being introduced. The bad part is that most of the work is still built around petroleum-based PVC.

You can learn more about making vinyl records as well as all types of mastering in my latest 5th edition of The Mastering Engineer’s Handbook.

Vinyl records continue to captivate music enthusiasts with their rich history and evolving technology. As the music industry navigates the digital age, vinyl’s enduring charm ensures its place in the hearts of listeners worldwide.

Sources

  1. https://markwideresearch.com/vinyl-records-market/
  2. https://makingvinyl.com/vinyl-boom-at-a-turning-point/
  3. https://www.yellowbrick.co/blog/music/top-tech-innovations-in-music-how-technology-is-changing-the-musical-landscape
  4. https://www.mdpi.com/2071-1050/15/22/16100
  5. https://link.springer.com/article/10.1007/s43546-020-00004-x

Click here to find out more.

New Music Gear Sunday: Sonible prime:vocal Vocal Enhancement Plugin

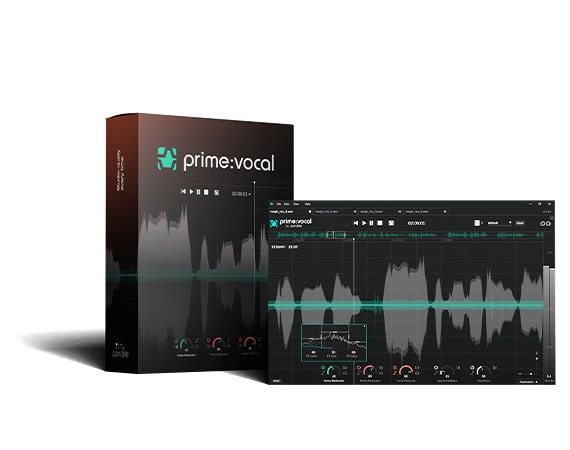
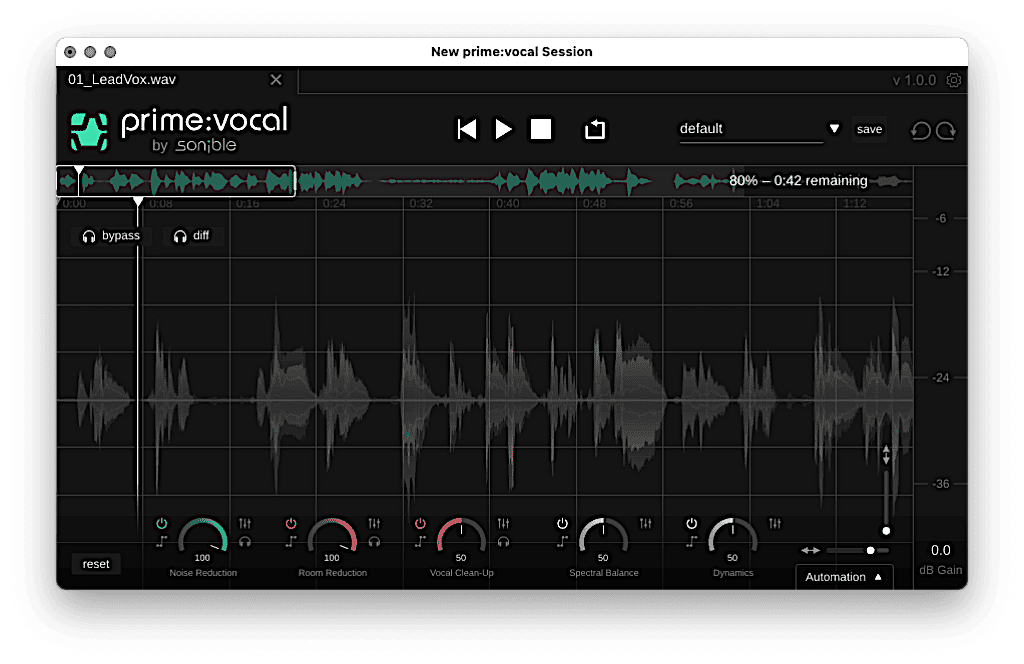
Today when so many artists are recording their vocals at home, the inevitable room and background noises rear their ugly heads. While there are a lot of very good AI-enabled de-noise plugins available, most of those are geared to dialog, with singing not being a priority. Sonible’s new prime:vocal plugin, on the other hand, is designed to not only de-noise a vocal, but enhance it as well.

Sonible prime:vocal plugin

First of all, Sonible has some of the best AI-powered plugins available to the point where their AI-engine is white-labeled to other manufacturers. And they’re specifically geared to music, not post-production, which can really make a big difference in the final result.

prime:vocal can be operated as a stand-alone app or as a plugin in any ARA-assisted DAW. Whichever way you choose to use it, it automatically begins analyzing the signal and soon as it’s sensed. From there it intelligently sets all the parameters as it sees fit, but there’s a lot of tweaking that’s available to the user as well.

AI-Driven, But Lots To Tweak

For instance, below the large display you’ll find controls for Noise Reduction, Room Reduction, Vocal Clean-Up, Spectral Balance and Dynamics. The Noise Reduction control is designed to remove steady-state noises like air conditioners or fans, or incidents of door slams or car horns, as well as reducing any instrument bleed either from live tracking or headphone leakage.

Room Reduction reduces the affect of the room on the sound, while Vocal Clean-Up provides both a De-Essing section and a De-Plosive section, where you can choose between bypass, Soft, Medium and Strong settings.

Taking things further, a Spectral Balance parameter processes the signal for general tonal balance.  It features a selectable profile (Vocal Low, Vocal High, Speech Low and Speech High) along with a Color parameter that lets you set Spectral Balance for Warm, Neutral or Bright coloration.

Next comes the Dynamics processor, which offers several options for level-riding and compression. prime:vocal also features internal automation that allows the user to automate the settings of the various processors over the length of the vocal.

prime:vocal normally sells for $179 but is available for just $119 until January 20th. A 30 day free trial is also available.
https://www.sonible.com/primevocal

Jerano’s way!


Jerano does things his way.
Correction, we mean “The Way”.

With performances in the best clubs in Amsterdam, Utrecht and surroundings, this man is doing super fat.
The streams and views on Spotify and YouTube are skyrocketing.
After dropping 2 EPs in 2 months, Jerano drops his summer tune at the end of May.
Jerano – De Manier launches incl. music video.

Jerano is characterized by his very accessible sound. His beats and music are accepted by many. Jerano also creates a positive atmosphere and energy in the audience that many will still talk about afterwards.

Jerano’s rapid growth in popularity has come about through the success of his latest tracks such as:  “Loca EP”, “So Nice EP” , “No love” and “Balans” and more is on the way.

Available on all platforms : CLICK HERE (FANLINK)

#Spotify #Deezer #ITunes #googlePlaystore TIDAL: LINK

ALLXS dropt bom!


nu beschikbaar op alle platforms

click hier https://uncvrd.co/to/THISWAY

One Night Stand!


OUT NOW / Nu verkrijgbaar op alle platforms click hier: https://uncvrd.co/to/ONS www.firstclass-music.com www.AotofLip.nl

INFLUENCERS WANTED


de details verschijnen spoedig!


de details verschijnen spoedig!


Influencers wanted

de details verschijnen spoedig!

– FCM


                                             de details verschijnen spoedig!                                                             de details verschijnen spoedig!


OJKB WINT PARTYAWARDS!

2017 zal worden afgesloten met een prijs !!! leer er hier meer over


De jaarlijkse party awards zijn weer gehouden deze keer in Etten-Leur en jawel de broodjes waren erbij.


OJKB won de PARTY AWARD voor POPULAIRSTE DJ ACT 2017

We hebben hier nooit rekening meegehouden maar dat maakt dit des te leuker, wat een super eer!

– OJKB

De heren begonnen in 2015 met 60 optredens dit grapje liep al snel uit de hand naar in 2016 tegen de 120 shows..
Vervolgends in 2017 zaten de heren tegen de 150 shows en nu in 2018 zowaar bijna 200 optredens.

Wat een leuk grapje heh! heren gefeliciteerd.

Previous